Saturday, December 22, 2012

I have decided to go with an acoustical lay-in ceiling. I feel it will be more versatile with my needs. Here is a rough layout of the initial grid plan.......


All ceiling tiles are 2' x 4' high moisture resistant with exception to those which will need to be cut down to 2' x 2' at each end of the lights. The ceiling tiles around the edges will have to be cut 4" smaller to make up for the width of the wall's. I will be using 2' x 4', 4 lamp, fluorescent lights. Haven't decided on the lenses yet as to whether to go with the polished parabolic or the regular plastic. In the small space I just do not see the need for the upgrade to the polished parabolic so I will more than likely stick to the regular plastic lens.

More later.......

Friday, December 21, 2012

This morning I received my delivery from Home Depot which included the linoleum for the floor.......


As well as lauan underlayment, and sheetrock........


 I should stay busy for the next few days.

More later.......

Sunday, December 16, 2012

I added a widget to the blog where one can subscribe and get email alerts when I update for all who are interested.......

Now on to the latest update!

I spent this weekend sanding, conditioning, staining, and sealing with polyurethane the brew-stand.

Here is with just the gun-stock stain.......


And here is after the poly-coats.......


And here is the cork tiles resting at room temperature to settle out flat before I peel the backs off and adhere them to the top of the table. I'm doing this for the protection against the heat to the top of the wooden table.......


Once I adhere the tiles to the top of the table I will also seal any gaps and contact points between the tiles with heat resistant silicone.

More later.......

Thursday, December 13, 2012

So I continued to build the brew stand.......


Now, the reason I made the table three foot deep is because I did not know how I wanted the kettles exactly as to where the thermo-wells should be placed and this is what I got.......


If I have had a clue I would have put the element adapters at a 45 degree angle to the right closest to where the panel was going to be mounted but I did not know at the time. So they are welded straight back from the outlet to the front. Oh well, to late now. Just have to adapt and overcome.

Well, do they all fit?


If I need I can move them forward a bit but everything looks just fine. Now to stain and seal.

More later.......

Monday, December 10, 2012


Time to start the Brew Stand. I decided to build it out of wood and liked what Kal did on www.theelectricbrewery.com so I followed his design but enlarged it a bit. I still kept with the 36" tall but went with 3' deep and 6' long. Here is what I did to date.......


Here was my shopping list:

1.      (Qty:3) 12 foot long piece of 2x6"
2.      (Qty: 1) 8 foot long piece of 2x6"
3.      (Qty: 4) 8 foot long piece of 2x4"
4.      (Qty: 14) 10 foot long piece of 1x4"
5.      (Qty: 24) 3/8-16 x 5" hex bolt 
6.      (Qty: 24) 3/8"-16 hex nut
7.      (Qty: 52) 3/8" flat washer
8.      (Qty: 4) 3/8" x 5" hex lag screw
9.       (Qty: 8) 2.5" deck screw
10.   (Qty: 76) #8 x 1.5" flat head wood screw
11.  6" long 3/8" softwood drill bit
12.  6" long 9/32" softwood drill bit
13.  7/64" softwood drill bit
14.  946mL can of MinWax pre-stain wood conditioner
15.  946mL can of MinWax Gunstock water-based wood stain
16.  946mL can of MinWax polyurethane clear semi-gloss
17.  3-4 disposable foam brushes

Have the store cut the 12 foot 2x6" lumber in half to make six 6 foot long pieces.

When you get home trim 5 of the six foot long 2x6" pieces to 69". Cut the other 6 foot long piece in half to make two 36" long pieces.
Also cut the one 8 foot 2x6" piece into two 3 foot pieces. These will be used as the sides and a top center brace.
Cut the 2x4" lumber into eight 34" pieces. These will be screwed together in sets of two to create the 4x4" legs.
Cut the 1x4" lumber into forty-two 36" pieces to be used for the shelf tops.

You should end up with the following pieces ready to be bolted & screwed together:
(Qty: 5)   2x6x69" 
(Qty: 4)   2x6x36"
(Qty: 8)   2x4x34"
(Qty: 42) 1x4x36"


Time to do some cutting.......


I took and cut the 2x4's and screwed two together to make the legs.......


I cut the 1x4 to 36 inches long. Yes all 42 of them.......


I cut 5 of the 2x6's to 69 inches long for the front and back rails for both the top and bottom as well the upper support rail. I also cut the four of the 2x6's to 36 inches long for the side rails for both the top and bottom.......


Now for drilling holes and bolting all this wood together.......


Had to counter-sink the back of the 2x4's as my 5 inch long bolts were about an 1/2 inch to short. No biggie as it worked out just fine.......


Laid some of the 1x4's on top to see what it will look like but had to call it an evening for now.......


I will lay the 1x4's across the bottom first and screw them down then do the top. Then will come time to stain and seal the brew stand and let it dry before the next step. Hope to get to this within the next couple of days.

I wanted to go ahead and build the Brew Stand and sit the kettles on it to get a feel of what the space would be like and give me a better idea as to where to install the exhaust fan's as well as the control panel and so forth. 

More later.......

Monday, December 3, 2012

~*~GREAT NEWS~*~

After a long wait since the first part of August the KETTLES have now arrived. I have to say that the quality and workmanship is awesome and well worth the wait. Many thanks to John at Stout Tanks & Kettles for such an awesome 20gal. set-up.......


Mash Tun with false bottom.......


Hot Liquor Tank with stainless HERMS coil....... 


Very excited, even with still so much work to be done, it is nice to have the kettles as it will help push me to completion. 

More later.......
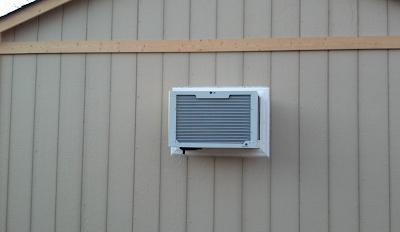
Got the wire pulled, panel mounted, and hooked-up. Framed in and mounted the AC/Heater unit and put up a cheap shop light for the time being.......


More later.......

Sunday, November 25, 2012

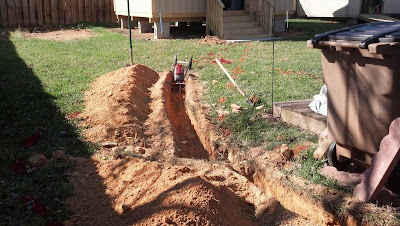
Having a four day weekend was nice as I had time to get a few things done. I dug a trench to lay pipe for the 100 amp sub-panel to feed my brewery.......


First it is advisable to call 811 before you dig to have all of your utilities marked.

The white line is where I suppose to dig. The red line is the electrical feed from the power company and the orange is the phone line.

I used a Mantis electric tiller which I have to say is awesome. I have owned two of these in my life time and both did a great job. This one will clean up nicely and will be with me for many years to come to help in landscaping and gardening. Again I cannot speak highly enough about this tiller as it has lots of strength and is a whole lot quieter than a two-cycle gas one.......


I used this tiller to break ground in helping break up the top layers of the grass and then on to the hard-pack. Once loosened up I shoveled it out and used a pick-ax to take care of the really hard stuff such as rocks and the like.......


As you can see to the upper left of the last photo that one should expect a little dirt left over as to compaction displacement of the dirt you remove as well as to the added volume of the pipe.

Now for getting the wire pulled in and hooked up.

I just received confirmation that the kettles are being shipped tomorrow. I can hardly wait. Still lots of work yet to be done.......

More later.......

Wednesday, November 14, 2012

Now on to the more important stuff.

The control panel has came along right nicely. I was able to drill, cut, as well as paint the panel plates as well as the panel box and then proceeded to mount all of the devices and instruments on the exterior of the panel.......


I heard from John from Stout Tanks and Kettles last week and was told that the kettles should be ready to ship within the next couple of weeks. Hooray!!!!!!! 
Can't wait.

More later.......